Bloglovin

Follow
Showing posts with label Archival ink. Show all posts

Thursday, 16 March 2017

#52CafeCards - J is for Journey


Hello again my lovelies!
Here's Café Card for J.
To find out more go HERE.

We are all on a journey... Called Life.
It has twist and turns, ups and downs and is full of surprises!

I used:
Playing card
ArtC  Arrow stamps
Quote stamp
Deli paper
Archival ink in
Black, Plum, Olive
Pebeo acrylic paint
DoveCraft Alphabet stamps

Find me on Instagram.

Thanks for stopping by!
Crafty hugs
Sez x


Wednesday, 1 March 2017

#52CafeCards- H is for Hearts


Hello my lovelies!
Here's my next CafeCard.
I'm behind on most things at the moment but I'm catching up!

This weeks prompt was Hearts/Hummingbirds...
I opted for the hearts.


I used:
Playing Card
Gesso
Paperartsy Eclectica EDY01Stamp Set
Archival Ink in Black/Watering Can
Posca Pen in Red
Scribblicious Pen in Gold
Masking Tape
Iridescent Glitter
Glazing Fluid

You can join in HERE
For day to day postings of my makes find me on Instagram.

Thanks for stopping by!
Let me know if you are joining in too,
in the comments below.
Crafty hugs
Sez x

Saturday, 4 February 2017

#52CafeCards - D is for DragonFly

Hiya my lovelies!

Here is my Café Card  D is for Dragonfly.
I used:
Playing Card
China & Snowflake Fresco Paints
Dragonfly stamp from JOFY13 by PaperArtsy.
Black Archival Ink
Silver Scribblicious Pen
Iridescent Glitter
Liquitex Glazing Fluid
Green Washi Tape


If you want to join in read this post!

You can find my posts on FB & Instagram.
Go follow me!
😊
Thanks so much for stopping by!
Crafty hugs
Sez x


Monday, 29 August 2016

PaperArtsy Bead, Charms & Dangle Challenge


Hiya my lovelies!
I've gone paper bead mad!
In my last post about paper beads
I showed the paper beads I'd made for a swap.
Well, over at PaperArtsy  the theme for the challenge is beads, charms & dangles!
Perfect!
I first had to decorate the paper.
I used Fresco Finish paints in London bus, Hey Pesto & Pumpkin Soup.
 Derwent Inktense Blocks in various colours & some Copper acrylic paint.
Once dry I stamped it with the clockwork heart & the cogs stamp from
PaperArtsy Eclectica Darcy 02 set in Black Archival Ink.


I cut my strips out and made some tapered beads:

 
Some round beads:


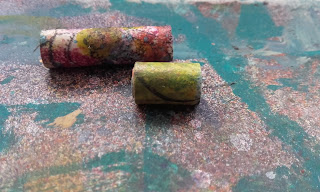
Some tube beads:


Some smaller tube beads:


I then glazed some using PaperArtsy Metallic Glaze:


Some in  PaperArtsy Gloss Glaze:


Some in PaperArtsy Pearl Glaze:


I chose the beads I wanted to use & decided my dangle would be earrings.
Don't look too closely at my loops, they're the best I could do with my dodgy hand!


So here's my entry for the challenge!
Go on over & take a peek at the other entries here.

Cheers for stopping by!
Feel free to leave me a comment.
Crafty hugs
Sez x

Friday, 19 August 2016

My Cosmic Gown


Hiya my lovelies!
I've got something a bit different to share today...
My little brother (who's not so little) got married in New York a few weeks ago!
The newlyweds had a reception here when they got back.

I originally got my dress from the Oxfam website.
I fell in love with it but wanted to tweak it a bit.
So, I decided to 'decorate' it.
I started by masking off the top of the dress.
I wanted to keep this plain.
I got out my Decoart Media Misters and my Daler Rowney
Pearlescent Acrylic Inks & basically went bonkers with them!
I had to take it outside after realising I'd got it all over my floor...
(I always realise after) but it cleaned up with baby wipes!
Round two was done in the garden hung up on the washing line.

Close up

It shines all different colours in the light!


I was over the moon with the results!
My very own cosmic, shimmery gown.

I had to make the happy couple a card too!
I used a stencil from TCW Mini Life Remembered & used some
pink and blue Daler Rowney pearlescent Acrylic Ink & sponged it on
as a background. Once dry I stamped the metal patchwork heart stamp from
PaperArtsy Eclectica Darcy 02 set for my brother (he's a welder) &
I used the word heart stamp from PaperArtsy Eclectica Darcy 01
set for his wife (she's a teacher) Get it?
Anyway, I went round the edges with Archival Ink in Watering Can
which I also used on the stamps!
Ta da!
My version of a CAS card which is a first! 

Now it was all going to plan until the day of the reception...
I spent most of the day sorting my tribe out (there's quite a few of us, 6 to be exact)
& getting ready. This takes me so much longer to do now.
Troweled enough make up on to render a wall,
remembering not to put my dress on til last,
otherwise I'd get it dirty before we'd even left the house!
Stepped in my dress to put it on & after 3 of us trying to
squeeze me into it & do the zip up,
it wasn't happening.
Yep, I've put on so much weight in 4 weeks it doesn't fit!
BLOOMIN' MEDS!!!

All was not lost, I had a back up dress.
All girls have a back up dress.
Still, I'm sad I didn't get to wear my cosmic gown.
One day...

Cheers for stopping by!
Feel free to leave a comment.
Crafty hugs
Sez x


Sunday, 14 August 2016

PaperArtsy Pattern Challenge

Hiya my lovelies!
I'm actually going to enter a challenge!!!!
Woo hoo!
It has been too long, I know.
This project is for the PaperArtsy Pattern Challenge.
I found an old Amazon box, (other online stores are available)
you know the ones like a folder, & thought I'd give it a paint!

Items for this project are:


I'll tell you what I used as we go along anyway!
Ok, I started by gessoing the entire folder.
I then squirted Spanish Mulberry, Pansy, Concrete & South Pacific
Fresco Finish Paint (my fave colours)
& used a dry brush to slap them on! I love this technique because
you never know how it will turn out! Fabulous!


Turned out like this!


I then painted a coat of South Pacific & let it dry with the help
of my trusty heat gun. (I was getting impatient!)
I then dry brushed another coat on top.
Love the result!


On the hinge parts of the folder I stamped a hinge image
from the HP1103 set 2 inches down from the top & 2 inches up from the bottom.
I did this on each one using Jet Black Archival Ink.
I then stamped the lock from the same set.
I stamped the big stamp along the top & bottom using Watering Can Archival Ink.
Then using the leaf stamp I created some patterns.
These were in Watering Can Archival Ink too.


I then went around the edges with the hollow circle strip stamp from FR4 set
in Watering can Archival Ink. I then squirted some Pumpkin Soup Fresco
onto a palette & stamped circles using an old tape tube.
I lined up the rest of the stamps in FR4 set to make a pattern
& stamped the flaps using Watering Can Archival Ink. I also
stamped on the other side in the same ink but I used the cog stamp from EDY01.
I used some low tack masking tape around the area so I didn't overstamp.
I like to use this grey colour for stamping backgrounds as it doesn't stand out too much.


I decided to overstamp the lock & hinge stamps using Copper Pearlised Paint.
I also used this to paint a rectangle inside on the top flap and around the edges.
I overstamped the copper rectangle inside with the
Happiness stamp from HP1103 using Jet Black Archival Ink.
I added a piece of ribbon and a handmade (by me) polymer clay
bead as a closure & a notebook & pen.


Voila!
I really like how it turned out.
Cheers for stopping by.
Leave me some love & come back soon!
Crafty Hugs
Sez x


Saturday, 16 May 2015

Clipboard Makeover

 Hiya my lovelies!
Today, I decided my clipboard needed sprucing up!
I gessoed it and then squirted it with blobs of Fresco Paints in Sky, South Pacific, Eggplant & Sherbert. I used a dry brush to spread the colours on both sides. I love this technique! I never know how it going to look and it reminds me of tie dye! 
 
 
I told you I'm a hippy at heart!
 
 
I used my stencils and stamps on the front...
 
 
and the back.
 
 
I wanted to make a feature of the sun...
 
 
so I collaged a face onto it and blended it with some copper paint.
 
 
I then used a black pen to add detail to the sun and a white Posca pen to doodle.
 
All done!  
 Now I have a fab clipboard to help me doodle, colour or write while sitting infront of the T.V!
 
I would like to enter this project into the Words Challenge over at PaperArtsy.
Thanks for stopping by!
Crafty hugs
Sez x

Saturday, 2 November 2013

Inspired by Jo Myhill for PaperArtsy.

 I know... 2 posts in 1 day!
Get me!
Over on the PaperArtsy Blog Jo Myhill is guest designer. She has done 3 great projects!
I have tried to incorporate all 3 in my challenge piece.
My photos aren't great as it's dark now & have had to rely on artificial light. A lot of the detail in the background is lost!
 
 
I used Fresco Paints in
Toad Hall, Tinned Peas, Sage, Beach Hut, Mocha Mousse mixed with Brown Shed & Blood Orange.
I also used Archival Ink in Olive, Stazon Ink in Timber Brown & Distress Ink in Walnut Stain.
 
 
Crochet flower with flower from a necklace & some cogs.
 
 
Shrink plastic heart & tag with stitching.
 
 
Yes, I used Darcy's Stamps again!
I love them!
I would like to enter this for the PaperArtsy Challenge.
Hope you like it as much as I do!
Thanks for stopping by!
Crafty Hugs
Sez x
 
Edit: Here's some pics in daylight. I also decided to add some Treasure Gold in Olive Bronze.


Mail Art

 Hiya my lovelies!
I know its been a couple of weeks since I blogged...
It's half term so I'm off work & have found some time to do some art & blog!
 
I've been wanting to do some mail art for ages... I was inspired, as always, by Darcy Wilkinson. The gal's a genius & has designed some fab stamps! I saw her post on mail art here.
I won some of her stamps from PaperArtsy in a challenge (see ATC Post). I bought the other set too!
I wanted to use them for this project. I decided to make 9 postcards...


Each one is different. I have used some other stamps in with Darcy's too.
I used Dylusions Inks, Sharpie pens, a white POSCA pen, Archival ink & metallic pens.
 
 
Each one has a message...
 
 I was inspired to make some of my own stamps for this project too.
I saw Jenniebellie make some. She's a fab inspiration to me too. She uses recycling in her art & has a fab Etsy shop! I also love her YouTube channel I'm a bit of a Belliette!
Check out her stamp tutorial here.
I just stuck some string to some scrap plywood I had...
 
 
I have posted them to some of my followers on Twitter!
Watch your letterboxes ladies!
One of them will be getting the parcel below with something special inside...


Thanks for stopping by!
Crafty Hugs
Sez x